Skip to content


Here’s why you might hate welding symbols: They look like an inebriated gang of crop-circling aliens took a shot at recreating the enigma code. Here’s why you should love welding symbols: Once you’ve channeled the Turing deep inside of you to gain some comprehension of this mess, it can make a huge difference. Even a basic understanding of welding symbols will do wonders for your welds. So slap on a helmet and get ready for a crash course in basic welding symbols.
Welding Symbols Meaning
Welding symbols are used to communicate between the designer and the welder. Most blueprints for a welding project are heavily peppered with them, so it's crucial that welders have a complete understanding of welding blueprint symbols.
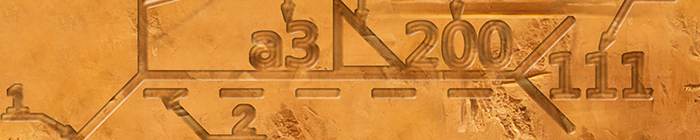
The skeleton of a welding symbol has an arrow, a leader line (attached to the arrow), a horizontal reference line, a tail, and a weld symbol (not to be confused with a welding symbol, which refers to the whole thing. See symbol 1). Hold on. If you’re already lost, don’t panic. It’ll all start making sense soon.

The arrow and leader line point to the joint in question, while the weld symbol tells you what type of weld to do. If the weld symbol is below the reference line (such as in symbol 1), the weld should be made on the same side as the arrow. If the weld symbol is above the reference line, the weld should go on the side opposite the arrow. If the symbol appears on both sides—you guessed it—the weld must be performed on both sides of the joint (see symbol 2).

But if there are two weld symbols that are slightly offset (symbol 2)? This means you need to perform a weld that is actually a bunch of smaller welds. In this case, the welding symbol will include numbers to the left and right of the weld symbol (tricky, we know). The number to the left indicates the width of the weld (or diameter), while the number on the right indicates the length. In the case of symbol two above, the number to the right will give you the length of the increment first (which is 2), then the pitch (distance between centers of increments), which in this case is 5.
In the case of symbol 3, since the weld symbol is not offset, the numbers refer to the length of the whole weld. This means that the weld will not be completed in segments but rather will be 20 units in length from start to finish.

There may be special instructions included in the tail of the welding symbol (see symbol 3). Generally, this tells the welder to use a particular type of welding or to pay attention to a certain detail. If nothing is included in the tail, the tail is considered optional and can even be left off entirely.
Don’t Be Put Off by Welding Symbols
When you're first starting out, welding symbols can be intimidating. From afar, symbols look like a mess of lines and weird shapes, but once you nail the basic elements of a welding symbol, reading them will become second nature. Welding symbols were created to simplify communication between designers and welders, so they're meant to be easy to understand. There’s much more to learn about welding symbols, but this condensed welding symbol chart of common weld symbols should get you started.

Up Your Welding Game With Welding Supplies From IOC
Welding Supplies from IOC carry all the necessary welding equipment you need, from MIG and TIG welders to protective gear and accessories. Shop for products manufactured by industry-leading brands like Miller, Black Stallion, and Lincoln Electric. If you’re interested in advancing your skill set further, check out our most popular improvement posts: