

If welding were a prescription drug, warpage would be its side effect. Except it always last 4 hours or longer and your doctor can’t help you. The good news is, with the proper tips you can almost fully eliminate warpage from your welding projects.
Warpage is caused when molecules expand and contract. It’s like putting a balloon in your freezer. When it gets cold, it shrinks. Take the balloon out and let it heat up. It’ll expand back to normal size again. However, with welding, you’re expanding different parts of your workpiece more than others. This causes it to become disfigured unless you use the proper techniques.
Tip 1: Know Your Material
Not all materials warp the same. Denser metals generally warp less because the molecules are already more compacted. Lighter metals warp more easily. The material thickness also plays an important role in warping. If you’re welding a thin piece of sheet metal, you’ll probably need to take extra precautions to avoid warpage.
Tip 2: Use Clamps
You’ve seen that hyperactive kid at the mall. They bounce off every wall in the room, pulling things off the shelf. You want to put them in a straightjacket, right? Clamps are straightjackets for your welding warpage. If your piece is clamped down where it can’t move, then it won’t move. You’ll want to make sure you clamp your piece in a way where it can’t twist, shorten or elongate. Personally, we like Strong Hand Clamps for their quick set-up and diverse functionality.

Tip 3: Move Around Your Workpiece
Warpage happens from heat. The less heat you build up in a certain area, the less warpage can occur. Instead of only welding one part on a project at a time, jump around to several sections. This will keep heat from building up in certain parts of your project and give it time to cool down while you weld another area.
Tip 4: Backstep Your Welds
Like the tip above, backstepping focuses on keeping you from building up too much heat in one area. Imagine you’re welding a joint. Instead of welding the entire line at once, which could build up a lot of heat, backstepping has you welding in sections.
First, choose a point several inches from the edge of your piece. Then weld all the way to the closest end.

Next, choose a point several inches from the starting point of your last weld. Start your next weld here. Go all the way til you reach the starting point of the last weld.
This way, you’re giving each part of your workpiece the most time possible to cool off without actually stopping your workflow.
If you’re still not sure how the backstepping process works, here’s a great video for you visual learners.
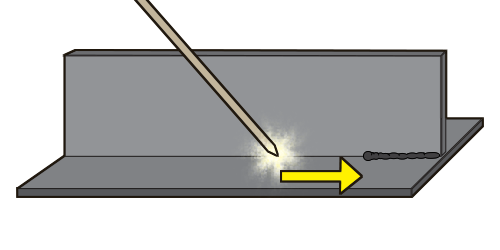
Tip 5: Intermittent Welds
Intermittent welds sacrifice strength to reduce warpage. Instead of welding both sides of a joint, intermittent welds zip-zag along each side (see the image below).

Note that this technique should only be used on joints that can afford to sacrifice some of their strength in order to reduce warpage.
Tip 6: Know Your Enemy
As you weld, pay attention to how your workpiece warps. Often, just seeing the effects of warping can help you prevent it the next time. Expert welders can actually predict how their workpiece will warp. Some will even intentionally set their workpiece in the wrong position, knowing the warpage will actually warp their piece into the correct spot. Boof. That’s the sound of our minds being blown.
Luckily, you don’t have to deal with warpage on your own. Here’s some equipment that make dealing with warping material a whole lot easier.