Skip to content

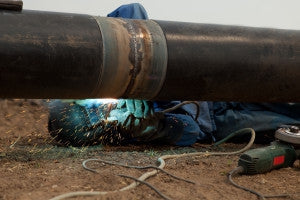
We tend to treat grinding like monkey work. For instance: When working in larger groups, often the lesser experienced welders are put in charge of grinding. But is that how it should be? Few experts will argue that grinding takes more precision and experience than welding does. But the idea that grinding is a task only fit for Neanderthals might not be so true.
The reality is that a good portion of the welding process relies on grinding. And it’s very easy to underestimate what that means. Knowing what you’re doing with a grinder might just be that breakthrough you need to take your skill level up a notch. Here’s a few tips many beginner welders don’t know about grinding.
Squeaky Clean
We pretty much all know you’ve got to keep it clean when laying down a bead. Any type of oxidization, paint or corrosion needs to be removed before you start up your torch.
What many of us don’t realize is that metal is often covered with some type of coating to keep it from rusting away before you purchase it. A common example of this is galvanized steel. If you were to weld through galvanized steel’s protective layer, the outercoat could cause complications in your weld. If you’re unsure if you’re workpiece has protective coating, it can be a good idea to lightly grind down the outside surface of where you’re going to weld. Just make sure to wear a mask with proper ventilation. Both grinding and welding galvanized steel can release harmful chemicals into the air.

Know Your Discs
Grinders don’t have a one-size-fits-all solution when it comes to which disc to use. Each type has a different, unique purpose. Here’s the major ones every welder should be familiar with:
- Cutting Disc: The name pretty much sums it up. Cutting discs are designed to cut. It’s usually the cheapest and easiest choice for a welder to use when compared with plasma cutting, oxy acetylene or other methods. However, cutting discs are limited by the thickness and type of metal they can cut.
- Grinding Disc: This type of disc is designed to grind down metal. It’s perfect for removing layers or beveling edges. While it will somewhat smooth the surface of your metal, that’s not what it’s truly designed to do. If your intentions are to keep your piece as shiny as possible, note that grinding discs will scratch up the surface of your metal.
- Flap Disc: While grinding disc are used to remove layers of metal, flap discs are quite literally flaps on sandpaper placed in a circle used to “smooth” your workpiece. If you’ve ever used sandpaper for woodworking, the process is quite similar. You start with a lower grit flap disc that has a coarse grain. From there, you work up towards higher numbers (finer grain sandpaper). If done correctly, you’ll have an incredibly smooth spot where you’ve grinded.
- Sanding Disc: This disc is much like a flap disc except instead of flaps of sanding paper, it’s just one solid piece. In many situations, a flag disc and a sanding disc overlap in their functionality and often it’s up to you as to which you prefer.
- Wire Wheel: Even flap discs will scratch up the surface of your metal. A wire wheel is designed to remove corrosion, mill scale, paint and other nasties without scratching up the surface of your workpiece. It’s perfect for giving an old chunk of metal a nice shine.
Invisible Welds
Have you ever seen a workpiece that didn’t look like it’d been welded at all? It’s as if the metal was manufactured as one solid piece. Often you’ll see this on welded art pieces, food grade equipment and structural pieces where the weld is in a visible location. How does one go about accomplishing this?
Depending on the type of weld, metal and location, the process might differ, but the general idea is the same. After you’ve laid your bead, you’ll notice your weld sticks out from the surface of your workpiece. To get it semi-even with the surface around it, you’ll need to remove a few layers off your bead. That means you’ll most likely start with your grinding wheel. The trick here is to remove metal from your weld but not from the surrounding workpiece.
Once you’ve mostly flattened out your weld, it’s time to move on to a low grit flap disc or sanding disc. The idea here is to get your weld flush with the surround surface without removing metal from your workpiece or digging into your weld.
A few welders might wonder, “Aren’t I removing most of my weld?” If you’ve gotten adequate penetration, your bead should be “inside” your material rather than holding them together like a piece of tape. As long as you don’t dig into your weld or the surrounding surface of your workpiece with your grinder, you shouldn’t be compromising your weld. If you do bring your weld flat and it falls apart, the problem is most likely with your penetration rather than your grinding.
Next month we’ll look at some of the more advanced tips that’ll help extend the life of your grinding tools and take your skillset to a whole new level. For more useful tips on welding, check out our article on preventing warpage with the button below.